Vapor template app
Oct 25, 2018 20:53 · 7398 words · 35 minute read
Vapor
A long time ago in a galaxy far, far away…I used Kitura to try out Swift on server. Simultaneously other frameworks were developed like Perfect and Vapor. At That time it was mostly alpha/beta versions or work in progress, it wasn’t as pleasurable as using Swift on machines with Apple sign.
Recently I decided to go back to that idea and Vapor is what I choose to test. So what is Vapor and from where did it came.
Version 0.1.0 was released just a month after Apple open sourced Swift. Next there was 1.0 version in 2016 and 2.0 in May 2017, but that all is not important because one year later there was version 3.0 that changed everything.
So what was so important about this release was that whole framework got rebuild on top of Swift-NIO. It happened so quickly that even Apple acknowledge the speed with which it was adopted.
Swift NIO
Where to start…well I can say short that it is a low level network communication framework for creating high level frameworks or applications, And that would be it. But let me explain some it step by step.
One of the most important things, Swift-NIO is made and maintained by Apple. You can go on their github and check it out, it is really neat. I guess there is something in what Chris Lattner said about Swift, that the goal is a total world domination, it is on iOS, macOS, tvOS, Linux and we can now build tensors with Swift for tensorflow, it is really cool, cause Swift is one of my favorite programming languages.
Swift NIO was created at Apple by people from iCloud team. You can check this great talk from Norman Maurer one of the creators. Under the hood Swift-NIO is an low level asynchronous, event driven network framework with non-blocking IO operations, it is based on netty but it is written in Swift 😍. If you are already familiar with netty you know that it is very good and there is no need for reinventing the wheel so guys from Apple decided to make it work, and they did, cheers for them 👏. Main thing to point here is that you will not use Swift-NIO at all, the only thing you need to know is that it is there somewhere under the hood making things easier for you. Vapor 3 is already using it and provides high level API for developers to easily interact with network events. It might look like I am underestimating the value of Swift-NIO here, but I want to write more about cool stuff from Vapor world and there is a loot!
Swift Package Manager
SPM was released with Swift 3.0 and is supported with this and all above Swift versions. If you come from iOS world then you will recognize it as similar to Cocoapods or Carthage, because is actually is doing exactly the same stuff. It is a simple dependency management tool that helps you keep track of, compile and link all external libraries that you use. What is really nice about SPM is that it works on Linux 💯. It is vastly used among desktop macOS apps or Linux apps written in Swift. But beside helping you to manage dependencies you can actually use it to create one, like a library you would like to publish for open source community or one that you are using internally in your company and would like to keep it maintained. If you want to know more about it I recommend checking one of the great tutorials from Ray Wenderlich sites written by Mikael Konutgan An Introduction to the Swift Package Manager or going directly to SPM documentation. Here the only thing you have to know is that if you would like to use some external library in Vapor app, you will have to use SPM to do it and I will present how many times in next chapters.
Vapor CLI
So to use Vapor you need to install it. On macOS I am using brew to manage most stuff that I am using so I recommend to just open Terminal and type in:
brew install vapor/tap/vapor
This will download and install Vapor Command Line Interface. On Linux you just have to type this in console:
eval "$(curl -sL https://apt.vapor.sh)"
It will also tell you if your Linux version is supported if any issues appear.
Now that you have this CLI tool installed you can check Swift and Xcode compatibility by running in Terminal:
eval "$(curl -sL check.vapor.sh)"
it should tell you something like this:
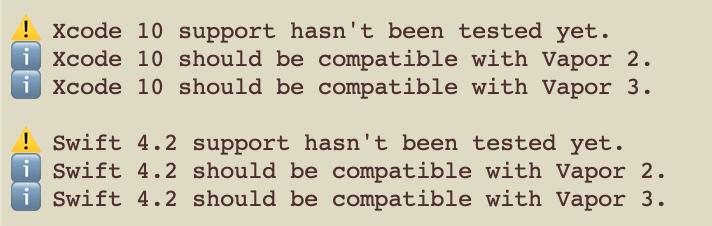
As you can see I have a warning, this is because I recently updated macOS to Mojave and Xcode to version 10 that also updated my development tools and Swift to 4.2. These versions are not yet fully supported by Vapor team but I did not noticed any issues while playing around with Vapor and hopefully you won’t see any.
Ok, now that we have all things ready, go into your working directory and create sample app by typing in Terminal:
vapor new sampleApp
This will make new folder called sampleApp, if you cd inside you will see something like:
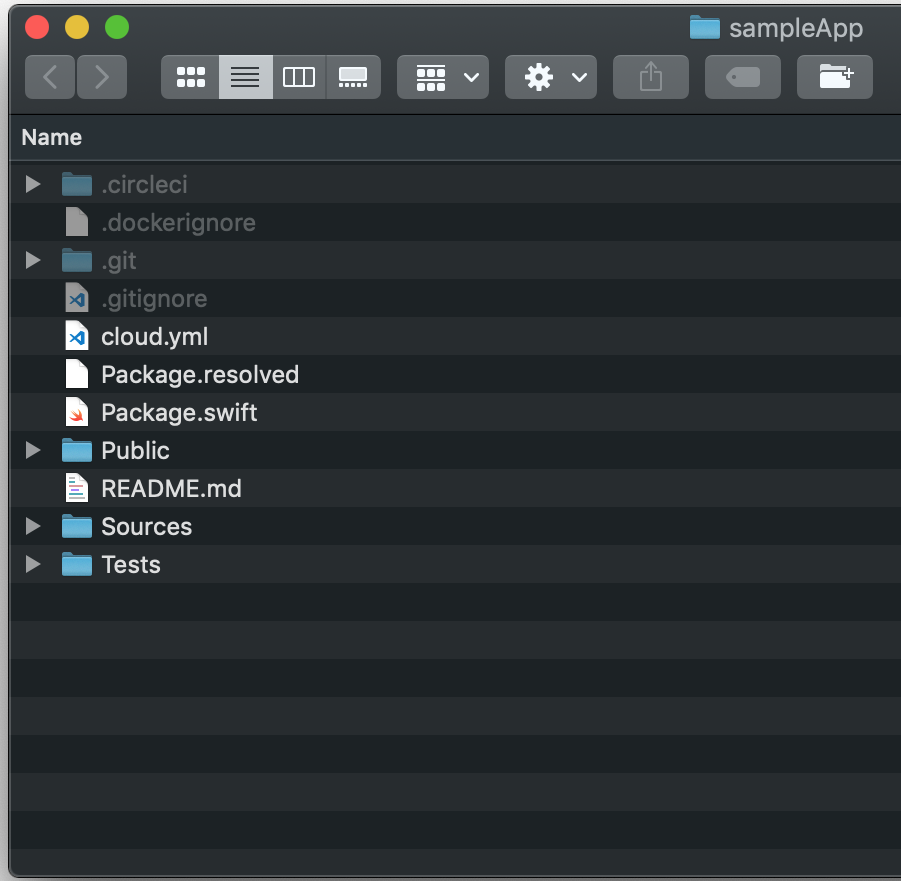
This is a structure of a base Vapor template. It event contains some sample model and SQLite database configuration with implementation of base CRUD operations.
Now, lets Build and run this project.
If you are using macOS and want to use Xcode, please jump here Using Xcode
For rest of us using command line, to build project type:
vapor build
This might take a while cause vapor will fetch all dependencies and then will build everything. After that just use run command:
vapor run
Using Xcode
Vapor has a full support for running in Xcode, to make it happen though you need to generate Xcode project, but don’t worry Vapor CLI will help you with that. Just cd into sampleApp directory and type:
vapor xcode -y
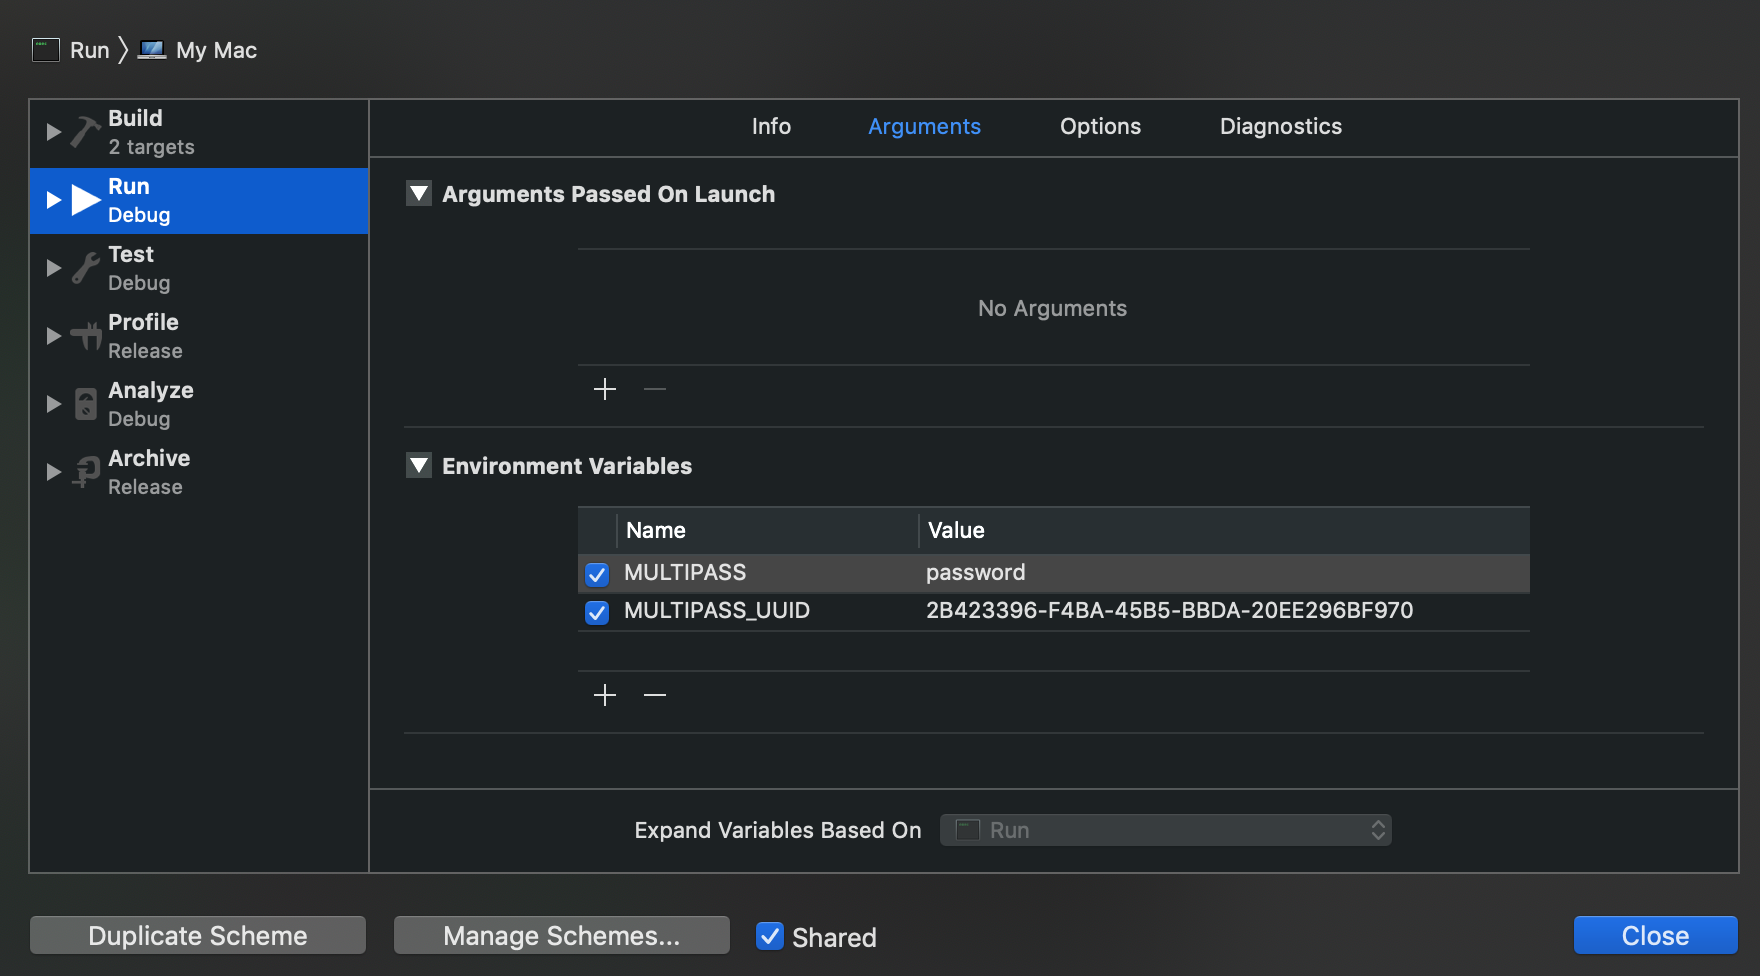
This command will generate and open Xcode project for you. Having Xcode support is great cause it gives you breakpoints and all LLDB commands just like in iOS/macOS apps 😍. From Xcode you can build and run Vapor app same as you would do with iOS or macOS app by using ⌘+r to build&run or ⌘+b to build ⌘+c to clean etc it all works the same. Sample vapor app comes with two default schemas, one is for tests and one for building and running the app, be sure you have selected correct Run scheme:

Where is my server?
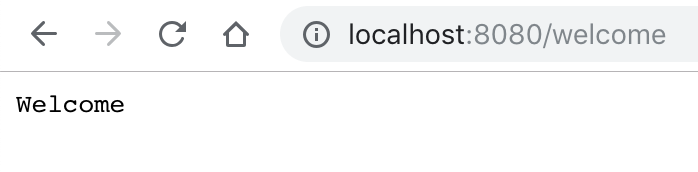
By performing above whether in Xcode or in Terminal you will start server and that will make your app accessible locally under port 8080 so if you go here you should see something like this:

Yeah, it works! Now you know how to start and run your project.
Routes
Let us now talk a bit about routing. How is it happen that when I type into my web browser: http://localhost:8080/index vapor server knows where to go, and knows what code to execute? It is quite simple. Our default project came with a file routes.swift, it already contains few pre-defined routes.
As you can see everything happens in this routes function:
public func routes(_ router: Router) throws
It provides a router object that has ability to extend available routes handled by this sample app.
Config
If you would like to change Vapor configuration, port number or add separation between environments, change cipher configuration and more, it is possible by creating directory called Config in root project folder. There you can put for example server.json file with some new configuration like this:
0{
1    "port": "$PORT:8080",
2    "host": "0.0.0.0",
3    "securityLayer": "none"
4}
To read more about what you can do go to vapor documentation.
Additionally port and hostname can be passed as vapor run parameters like this:
vapor run --hostname 192.168.31.215 --port 6969
Adding new route
So if I would like to create a new route like this: http://localhost:8080/welcome, that will return welcome message, what I need to do is add it to the router like this inside routes function:
0router.get("welcome") { _ -> String in
1    return "Welcome"
2}
Now going here I can see expected welcome message:
But what happened here? By sending request to the server for welcome route our sample app goes to the implementation in a closure that was registered under welcome. In this example it simply returns a String message that is then returned to the browser where it is displayed.
Keeping it clean
As you can probably imagine, one function to handle all routes and their logic that I have planned to my web application is not enough, it will be a mess 😱. There are ways to avoid this situation. Even in sample project there is example TodoController at the bottom of the routes.swift it hides the implementation for all (get|post|delete) operations that goes under todos route.
I still think we could do better…and we can. There is a protocol called RouteCollection. By conforming to it you can internally provide routes that you desire and also hold the implementation for controller separated from other routes in there. Let’s move our welcome route to new object called WelcomeRoutes:
0class WelcomeRoutes: RouteCollection {
1    func boot(router: Router) throws {
2        router.get("welcome") { _ -> String in
3            return "Welcome"
4        }
5    }
6}
Now we can move the logic implementation from our router to new controller class called WelcomeController:
0class WelcomeController {
1    func welcome(_ request: Request) -> String {
2        return "Welcome"
3    }
4}
I know there is not much logic there, we are just returning some dummy String value but still it is good to keep good practices from the beginning. To use this object in WelcomeRoutes collection just do:
0class WelcomeRoutes: RouteCollection {
1    func boot(router: Router) throws {
2        let controller = WelcomeController()
3        router.get("welcome", use: controller.welcome)
4    }
5}
In function boot we have our router so the content of welcome could be just copied from routes.swift, but we wanted to move logic to a controller so closure content was copied to WelcomeController, but that is not all. We still need to somehow tell in the main routes.swift file that we have this new WelcomeRoutes object. To do this routes object has a functionality to register whole collections of routes and registering our new collection will look something like:
0// routes.swift
1try router.register(collection: WelcomeRoutes())
Now you can check that going under http://localhost:8080/welcome still works but we now have a much more separated implementation for all of it.
Route Parameters
As you have already noticed probably we declared routes that are using HTTP GET. So let us personalize our welcome message by reading query parameters. It is pretty simple task as every Request object has QueryContainer structure that represents query, it also implements multiple variations of subscripts so to read for example query value with key name we need to implement something like this:
0func welcome(_ request: Request) -> String {
1    let name: String = request.query["name"] ?? ""
2    return "Welcome \(name)"
3}
And that is it, now calling http://localhost:8080/welcome?name=riamf will add personalized welcome message.
Since most stuff in Vapor works with Codable we can also do magic like this:
0struct Person: Codable {
1    let name: String
2}
3/* ... */
4func welcome(_ request: Request) -> String {
5    let person = try! request.query.decode(Person.self)
6    let name: String = person.name
7    return "Welcome \(name)"
8}
Here Vapor will decode query into our structure model called Person, nice 😍
Ok, but what if I would like to make an unknown route where I know only that one part of it will contain String value. This is also very easy in Vapor. First lets read parameter from request, we will do this in our welcome route like this:
0func welcome(_ request: Request) throws -> String {
1    let name: String = try request.parameters.next(String.self)
2    return "Welcome \(name)"
3}
Next we need to tell our router that we want to handle route localhost:8080/welcome/(some String value), to do this we can add new route to our collection and our already modified handler will do the trick of extracting route parameter:
0router.get("welcome", String.parameter, use: controller.welcome)Here we are saying that if something that goes after welcome and is a String value we want it to be handled by our welcome implementation where this String value is extracted and passed down to response nice and clear solution.
Other HTTP methods
Ah yes, not everything can be done with query parameters and HTTP GET method, there are others like POST for example, very broadly used. Vapor also makes this very easy. With support for Codable it could not be easier, remember our Person structure, we need to do one thing to make it availabe to use with POST content:
0struct Person: Codable, Content {
1    let name: String
2}
Adding conformance to Content type does everything we need. Now lets write new POST route in our collection:
0router.post(Person.self, at: "welcome", use: controller.postWelcome)As you can see here we are telling our router to look for Content of type Person.self in body of POST request to welcome endpoint and use postWelcome function as a handler
0func postWelcome(_ request: Request, _ person: Person) -> String {
1    return "Welcome \(person.name)\n"
2}
This is really nice, cause we see here that we already have unwrapped value of our parameter in handler function, ready to be used 👌. Now to check if this actually works we need to make a POST call to our server like this:
curl --request POST \
--data '{"name": "riamf"}' \
--header "Content-Type: application/json" \
http://localhost:8080/welcome
And it works just fine.
There are other HTTP methods that are supported by Vapor, but their implementation is very similar to what we saw already. I think you can see that this is very easy to create advance routing in your own Vapor app.
Leaf
So what is Leaf? It is a Vapor way of creating front-end applications, a very powerful templating language. It is not like whole Angular or Rails that provides a lot of functionality out of the box but it has I would say a similar templating functionalities for creating web page templates.
How to use it in Vapor project is very simple. With Swift Package Manager, cause this is a main dependency management system that is used in Vapor, most of this stuff is simple, you just need to add a Leaf package to the app like this:
 0import PackageDescription
 1
 2let package = Package(
 3    name: "vapor_base",
 4    dependencies: [
 5        .package(url: "https://github.com/vapor/vapor.git", from: "3.0.0"),
 6        .package(url: "https://github.com/vapor/leaf.git", from: "3.0.1")],
 7    targets: [
 8        .target(name: "App", dependencies: ["Vapor",
 9                                            "Leaf"]),
10        .target(name: "Run", dependencies: ["App"]),
11        .testTarget(name: "AppTests", dependencies: ["App"])])
This will add Leaf package to your application, from this point you can use it to build sites.
Next thing that needs to be done in the app is render configuration, we need to tell the app that we now have Leaf and we would prefer to use new Renderer. To do this we just need import Leaf framework in configure.swift file and add that line at the end of configure function:
0public func configure(_ config: inout Config, _ env: inout Environment, _ services: inout Services) throws {
1 /* ... */
2 config.prefer(LeafRenderer.self, for: ViewRenderer.self)
3 /* ... */
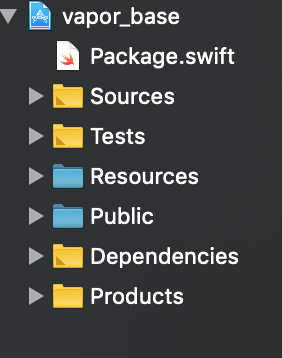
4}Now the only thing to do is prepare html templates. There is one default directory that is used by Leaf to look for web pages, it is called Resources and inside it a directory called Views, (./Resources/Views). Important thing is to create it in application root directory like this
Now you are ready to create first templates. In Xcode just select New File and from Other types select Empty and call it index.leaf. This way Leaf will know that it should render this file with injected context. Now I will show you an example content for this kind of file:
 0<!DOCTYPE html>
 1<html lang="en">
 2<head>
 3<meta charset="utf-8" />
 4<title>Welcome vapor template</title>
 5</head>
 6<body>
 7    #if(name) {
 8        <h1>Welcome #(name)</h1>
 9    } else {
10        <h1>Welcome</h1>
11    }
12</body>
13</html>
This file will be rendered as our index file. You can clearly see that it is just a simple html with some additional leaf tags. Here I used #if tag to check if variable name was passed into this template, if it was then I am using it to print welcome with name and if not then just a simple welcome.
I think it is clear how this part works, there is a lot tags you can use in templates I recommend looking into (leaf documentation)[https://docs.vapor.codes/3.0/leaf/overview/]. What you might wonder now it how this context is passed into the page. This is done by some magic in router. Let me show you example index route and then I will explain it all step by step:
 0struct IndexContext: Codable {
 1    let name: String
 2}
 3
 4public func routes(_ router: Router) throws {
 5
 6    router.get("") { (request) -> Future<View> in
 7        return try request.view().render("index", IndexContext(name: "Vapor"))
 8    }
 9}
Sample Vapor app has this file called routes.swift that you already know about, There you can declare routes handled by the app. I decided that going under empty route(line 6) so basically going to our server address http://localhost:8080 I want it to render my index template and that what is going on in line 7.
You can also see that I declared simple struct called IndexContext(line 0) that contain value name of type String. This is a page context that I am also passing to Leaf in line 7. If you look at leaf template above you can see that when I’m checking name variable it is actually a variable from this IndexContext, this structure values are passed down to the template and you don’t have to do anything like context.name it is already there.
This is just a dummy example of how values can be passed into Leaf templates but I think you can already see the possibilities and power of Leaf. You can pass there information extracted from database, whole models and by creating templates, tell them how to render the View without duplicating code. Whole logic can be done in Context, a Model for Leaf template, a dummy view Layer when you think of it in standard web MVC context.
Fluent
Now it is finally time to introduce you to Vapor persistance layer called Fluent. It is Swift ORM framework for integration with SQL and NoSQL databases. According to documentation databases that are officially supported are MySQL, SQLite and Memory, there is also unofficial support for PostgreSQL and MongoDB, I personally tested PostgreSQL and it worked just fine for me, here I want to focus on one of the supported ones like MySQL.
MySQL Local Setup
To setup MySQL database locally I recommend using docker this will assure you that we have same environment. First you need MySQL docker image so if you already have docker installed just run this in Terminal:
docker pull mysql:5.7.23
This will download container, now to run it with proper parameters try:
docker run -p 3306:3306 -e MYSQL_DATABASE=db_name -e MYSQL_ROOT_PASSWORD=root mysql:5.7.23
So, what is going on here, we are running the container on localhost, port number 3306, we are also passing root password and a default database name to be created.
Done, now you have running MySQL database with root user and default database schema db_name.
Adding Fluent dependency
Ok, so to actually use Fluent in project we need to add it as a project dependency in SPM. Open Package.swift and in dependencies array add new entry:
0.package(url: "https://github.com/vapor/fluent-mysql.git", from: "3.0.0-rc")
1/* ... */
2.target(name: "App", dependencies: ["FluentMySQL",
3                                            "Vapor"]
Now to update the project with new dependency run
vapor update
from terminal, this will download dependency and if you are using Xcode it will also regenerate and reopen project.
Now to create connection between Vapor app and our new database we need to add some configuration in configure(...) function from configure.swift file:
 0try services.register(FluentMySQLProvider())
 1
 2let hostname = Environment.get("MYSQL_HOST") ?? "localhost"
 3let portString = Environment.get("MYSQL_PORT") ?? "3306"
 4let username = Environment.get("MYSQL_USERNAME") ?? "root"
 5let password = Environment.get("MYSQL_PASSWORD") ?? "root"
 6let schema = Environment.get("MYSQL_DATABASE") ?? "db_name"
 7let mysqlConfig = MySQLDatabaseConfig(hostname: hostname,
 8                                        port: Int(portString)!,
 9                                        username: username,
10                                        password: password,
11                                        database: schema)
12
13
14let mysql = MySQLDatabase(config: mysqlConfig)
15var databases = DatabasesConfig()
16databases.add(database: mysql, as: .mysql)
17services.register(databases)
18
19var migrations = MigrationConfig()
20services.register(migrations)
This is a lot of code, but it is really simple. Here I choose to create a configuration with environment variables. First thing to do in line 0 is to register MySQL Fluent Provider, now from 2-6 we are reading environment variables and defaulting to local setup, in line 7 we create configuration with this variables and now we can create database connection and register it in services (lines 14-17), last thing to do is add some code to handle migrations…when we will have some models to migrate this part will be more important.
And done, now if you run the project you should see in a console log something like
...Migrating 'mysql' database...
This means that everything is working correctly 👍
Creating Fluent Model
It is time to create our first ORM model. Make a new file called User.swift with this content:
 0import Vapor
 1import FluentMySQL
 2
 3final class User {
 4    var id: Int?
 5    var password: String
 6    var uuid: String
 7}
 8
 9extension User: MySQLModel {}
10extension User: Migration {}
If you look at the top structure declaration, you will see that this is just a normal value type we all know, but what makes it really ready for Fluent is in the extensions section. Here you can see the conformance to MySQLModel and Migration. Important to address here is the fact that conforming to MySQLModel forces us to have a property:
0var id: ID? { get set }And you probably guessed it, this is a database id that will be used by MySQL 👏. There is also a possibility to just conform to Model protocol that will force us to provide information what is considered an id field for this entity using Key Value Codding, but MySQLModel does it for us in default protocol extension. Conformance to Migration protocol gives us ability to perform migration that will create table for this model, there are also two by default empty functions regarding migrations that we can implement:
0static func prepare(on conn: MySQLConnection) -> Future<Void>
1static func revert(on conn: Database.Connection) -> Future<Void>
prepare is used usually for creating table, updating columns etc, and revert is usually for dropping table.
So what we need to do to make migration? Remember the migration part from configure.swift we need to add this migration there:
0var migrations = MigrationConfig()
1migrations.add(model: User.self, database: .mysql)
2services.register(migrations)fluent table, it will look something like this:
|id|name|batch|createdAt|updatedAt|
| e?hs?M?G??V ?|User|1|2018-10-30 09:22:12.672274|2018-10-30 09:22:12.672274|
And done, now you have a functioning Model that can be used in application. As you already know by adding Conformance to other protocols like Content you can actually use this model as a body of your POST request to create new User in database.
Future…
Now it is time to present you the only thing that I think is not so easy to comprehend at first. Unless you already meet with them, cause this is indeed the same Future as you can meet in Java or asyncio python. But if you still don’t have any clue what is it I will explain it now. We already mentioned that Vapor 3.0 works on top of Swift-NIO that is basically an low level event framework, thanks to that we can perform many concurrent no blocking operations, and to represent that kind of operation in Vapor we can use Future. I think that the best way to learn something is to write some sample code and see how it works. So let’s do that.
Creating User
We already have this User so let us work with that, first add conformance to Content and Parameter protocols to be able to use User as a body and parameter for request:
0// User.swift
1extension User: Content {}
2extension User: Parameter {}
Next let’s add route to create new user:
0// routes.swift
1router.post(User.self, at: "user") { (request, user) -> Future<User> in
2    return user.save(on: request)
3}
You probably already noticed that we are now using Future here, but why? Saving data to database is a blocking operation, it might take less then a second or it might take more then a minute it depends on many conditions so here it is actually send to be done as a background task called Future and we declare that as a result of this saved user we will Return new User object. Let’s try this out:
curl --request POST --data '{"uuid": "d1a76cc2-e1ef-11e8-9f32-f2801f1b9fd1", "password": "secret"}' \
--header "Content-Type: application/json" \
http://localhost:8080/user
and in result I see:
{
    "id":"1",
    "uuid":"d1a76cc2-e1ef-11e8-9f32-f2801f1b9fd1",
    "password":"secret"
}
This is super nice! Fluent makes working with Futures much easier cause it delegates most of the work by default to be done in the background and the result will come in Future and will be returned to you to do something with it.
Extracting User
Let’s try something else, like using our model as a route parameter since we already added conformance to the Parameter protocol we can do this:
0// routes.swift
1router.get("users", User.parameter) { req -> Future<User> in
2    return try req.parameters.next(User.self)
3}
Ok but exactly is going on? Request object that is available in every implementation of route closure has a connection to database, it can also look for parameters in the request. Here we are telling to our router that after /user/ we are expecting a User.parameter, but User is an object and we cannot use it as a single path parameter…right, we can’t but we can use its id 😱. Look at the result JSON that was returned from endpoint for creating new users, there is a id 1, now with this implementation we can use this id as a route parameter like this http://localhost:8080/users/1/ and it should return again User object from our database in JSON form and we managed to do all this without actually doing a lot of writing, most of this stuff is available out of the box with Vapor and Fluent…it is pretty sweet 😍.
Authentication
Ok so we now know how to create routes, pass data to our service, store this data however we would like to, and return data, we also looked at Leaf that can help us present this data in form of HTML pages. Last thing that I find necessary to have is some kind of authentication method. You probably already guessed, there is a swift package for Vapor that do just that and it is called Auth.
Again first we need to add it to our SPM:
0dependencies: [
1        ...
2        .package(url: "https://github.com/vapor/auth.git", from: "2.0.1")
3    ],
4    targets: [
5        .target(name: "App", dependencies: ["Authentication", ...]),
6        .target(name: "Run", dependencies: ["App"]),
7        .testTarget(name: "AppTests", dependencies: ["App"])
8    ]
To use Authentication framework we need to register it in configuration function from configure.swif file, like this:
0import Authentication
1...
2public func configure(_ config: inout Config,
3                      _ env: inout Environment, _ services: inout Services) throws {
4try services.register(AuthenticationProvider())
5...
Now everything is ready to make what exactly? Vapor Authentication frameworks provides these types of authorization:
- Basic authorization
- Bearer authorization
- Web authentication with Session
- OAuth 2.0 supported by Imperial
There is a lot, and It would require a lot of time to cover everything so I will only cover in detail Basic Authorization and I will try briefly write about others.
Basic Authorization
Basic authentication is the simplest technique of access control, it requires user to constantly send HTTP header field that contains username and password, it is also the weakest cause it provides no security for transported credentials, just a Base64 encoding.
So, we already have database connected to our service and we have this User model, so now let’s add this:
 0import Authentication
 1...
 2extension User: BasicAuthenticatable {
 3    static var usernameKey: UsernameKey {
 4        return \User.uuid
 5    }
 6
 7    static var passwordKey: PasswordKey {
 8        return \User.password
 9    }
10}
We are adding conformance to BasicAuthenticatable protocol, to do this we need to tell the protocol which properties will be treated as username and password and we are doing this above. Now to make sure we will NEVER EVER save our password as a plain text, add this:
0import Crypto
1...
2init(id: Int? = nil, uuid: String, password: String) throws {
3    self.id = id
4    self.uuid = uuid
5    self.password = try BCrypt.hash(password)
6}
Here we added Crypto framework that ia available because it is a dependency on Authentication framework, so we now can use it inside User init to make sure that every created User will have hashed password. Ok, so now we have a model conforms to basic authentication. What else we need to do is decide on what routes are behind auth and what are not. So where we should do this, of course in
routes.swift, but to keep things organized let us create new RouteCollection called BasicAuthRouter where we will add new route that will extract users, whole thing should look like that:
 0import Authentication
 1import Vapor
 2
 3class BasicAuthRouter: RouteCollection {
 4
 5    func boot(router: Router) throws {
 6        let basicAuthMiddleware = User.basicAuthMiddleware(using: BCryptDigest())
 7        let guardAuthMiddleware = User.guardAuthMiddleware()
 8        let protected = router.grouped(basicAuthMiddleware,
 9                                       guardAuthMiddleware)
10
11        protected.get("users") { (request) -> Future<[User]> in
12            return User.query(on: request).all().map({ (users) in
13                return users
14            })
15        }
16    }
17}
And done! If you now go under http://localhost:8080/users you will see something like this:
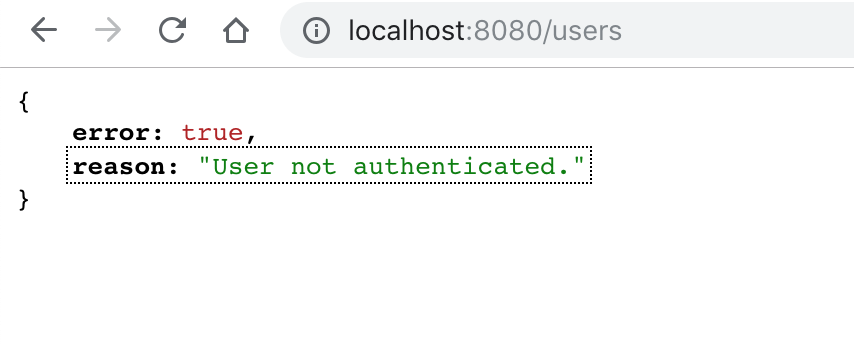
Hm…did I just blocked myself forever from accessing my own app? Cause I don’t have any user in database…ok I can create POST endpoint that will create user for me, and we actually already did that, but that endpoint should also be moved here under protected routes, we would not want to have it exposed to the world! So what can we do now…🤔…well we can migrate new user 😱.
So far we did nothing regarding migration except adding new User model that creates table in MySQL database. Now we will learn how to use migration mechanic to create admin user, let’s create new file AdminUser.swift:
 0import Vapor
 1import FluentMySQL
 2
 3struct AdminUser: Migration {
 4
 5    typealias Database = MySQLDatabase
 6
 7    static func prepare(on conn: MySQLConnection) -> EventLoopFuture<Void> {
 8        guard let password = Environment.get("MULTIPASS"),
 9            let uuid = Environment.get("MULTIPASS_UUID"),
10            let user = try? User(uuid: uuid,
11                                 password:  password) else {
12            fatalError("UNABLE TO ADD ADMIN USER 😱")
13        }
14        return user.save(on: conn).transform(to: ())
15    }
16
17    static func revert(on conn: MySQLConnection) -> EventLoopFuture<Void> {
18        return .done(on: conn)
19    }
20}
So what is going on here. Everything is happening in prepare function like in normal migration, here we are creating User model and saving it, so after our server will start, this user will already be inserted into database. Password and UUID for this user is taken from environment variable, remember that you can pass environment variables like this:
Now if you want to actually perform the migration you need to add it in configure.swift like that:
0var migrations = MigrationConfig()
1migrations.add(model: User.self, database: .mysql)
2migrations.add(migration: AdminUser.self, database: .mysql)
3services.register(migrations)
If you will run the server, it will perform new migration:
Preparing migration 'AdminUser'...
To check if this works, we can try to curl our secured endpoint, but to do that we need to prepare basic auth header. We know that our admin username is actually and uuid: 2B423396-F4BA-45B5-BBDA-20EE296BF970 and password: password. Basic auth requires base64 encoded values username:password so let’s do something like that using Swift REPL:
  1> import Foundation
  2. let str = "2B423396-F4BA-45B5-BBDA-20EE296BF970:password"
  3. let data = str.data(using: .utf8)!
  4. let header = "authorization:Basic \(String(data: data.base64EncodedData(), encoding: .utf8)!)"
str: String = "2B423396-F4BA-45B5-BBDA-20EE296BF970:password"
data: Data = 45 bytes
header: String = "authorization:Basic Optional(\"MkI0MjMzOTYtRjRCQS00NUI1LUJCREEtMjBFRTI5NkJGOTcwOnBhc3N3b3Jk\")"
You can copy and paste this into console and it will return your version of Basic auth header if you used same username and password to create AdminUser you can copy the result from here.
Now copy content of header variable, it will be a base64 encoded username and password that needs to go with the curl request that should look like that:
curl \
--header "Authorization:Basic MkI0MjMzOTYtRjRCQS00NUI1LUJCREEtMjBFRTI5NkJGOTcwOnBhc3N3b3Jk" \
--header "content-type: application/json" \
http://localhost:8080/users
And now you should see that you have full access to secured endpoint and the result should look like this:
0[
1  {
2    "id": 1,
3    "uuid": "2B423396-F4BA-45B5-BBDA-20EE296BF970",
4    "password": "$2b$12$GEX5aviSdY3RWN3HRkzE6uvTobeCwpuh/KV2K4AL1s17QS6Vy7CJa"
5  }
6]
Ok, what is wrong here? We are listing whole data for our User, even password, ok it is hashed but still we should not do that and there is an easy way to hide that. We will create an internal User model called PublicUser
0struct Public: Codable, Content {
1    let id: String
2    let uuid: String
3}
As you can see there is no password field here, so it will never be displayed 👏.
So the only thing is to perform the transformation from User to PublicUser we will do this inside helper method in User model:
0func publicUser() -> Public {
1    return Public(id: "\(id!)", uuid: uuid)
2}0protected.get("users") { (request) -> Future<[User.Public]> in
1 return User.query(on: request).all().map({ (users) in
2 return users.map({$0.publicUser()})
3 })
4}0[
1 {
2 "id": "1",
3 "uuid": "2B423396-F4BA-45B5-BBDA-20EE296BF970"
4 }
5]No password is visible now, remember to hide all of the vulnerable data that you keep in your database.
Bearer authorization
This type of authorization is based on tokens that are saved in database. When user tries to log in password and username are passed and server after authenticating the user, server will generate a token and will return this token back to the client. Then if user wants to call any secured endpoint, there is no need to pass username and password again, just the token is needed. This way we do not have to pass username and password in headers that is not secured at all. Token generated on server usually is valid only for some time like an hour or even less. After that, new request for the token needs to be performed to authenticate user and return new token or refresh old one.
Now how to implement this in Vapor. First we need to create Token class.
 0final class Token: Codable, MySQLModel, Content {
 1    var id: Int?
 2    var token: String
 3    var userID: User.ID
 4
 5    init(token: String, userID: User.ID) {
 6        self.token = token
 7        self.userID = userID
 8    }
 9}
10extension Token: Migration {
11    static func prepare(on connection: MySQLConnection) -> Future<Void> {
12        return Database.create(self, on: connection, closure: { (builder) in
13            try addProperties(to: builder)
14            builder.reference(from: \Token.userID, to: \User.id)
15        })
16    }
17}
As you can see in the Migration extension we are adding a reference to another entity, this way our User entity will be connected to Token and we will always be able to determine a valid token for user. Of course we need to add this migration in configure.swift file. We also could create a simple generate token function that will automatically create new token for user when logging in.
Ok but to actually make token auth mechanism, we also need to make Token model conform to Token protocol and User model conform to TokenAuthenticatable like this:
 0extension User: TokenAuthenticatable {
 1    typealias TokenType = Token
 2}
 3extension Token: Authentication.Token {
 4    static var userIDKey: UserIDKey = \Token.userID
 5
 6    typealias UserType = User
 7
 8    typealias UserIDType = User.ID
 9
10    static var tokenKey: TokenKey = \Token.token
11}
Now Authentication framework will know how to connect User and Token models.
There is also some work that needs to be done in router.swift or in new class that will be a RouteCollection for your secured data.
I highly recommend to try this out. Of course this is not all, cause we should also provide some mechanism for Token expiration and renewal but that itself is a subject for a whole new post.
Web Session
So now you should be aware of two different types for authentication. These methods were only for protecting your API and it is not possible to use them in web browser for example as there is no possibility to add custom headers to browser request. But to be able to handle browser auth you need to use Sessions. This is a smart mechanism to persist user access information across many requests. In Vapor they are handled with a middleware, so first you need to add this in configure.swift:
0middlewares.use(SessionsMiddleware.self)
1...
2config.prefer(MemoryKeyedCache.self, for: KeyedCache.self)
First line configures server session middleware and last one defines Memory Cache that will work as a Key-Value cache for sessions. Next we need to add conformance to PasswordAuthenticatable and SessionAuthenticatable for User model, first will allow Vapor to authenticate user with username and password. Next protocol is for allowing Vapor to store and retrieve necessary user session information in Key-Value cache.
Whole this should allow you to build routes that are hidden behind Session auth
0let authSessionRoutes = router.grouped(User.authSessionsMiddleware())The only thing that is missing is building a login page for User to enter username and password but I leave this for you to figure out 😉
OAuth
This method is more a open standard for authenticating than a method of authentication. Generally you are authenticating in 3rd party like Google that assures about your credibility to access data on server for example. So when you click Login with Google you are authenticated in Google that gives this application a token that can be used to validate your access to other server resources. Implementing this kind of mechanism in Vapor can be done by using Imperial it handles Github and Google as a OAuth providers for now. If you would like to implement this I recommend reading the source guide available here.
Testing
What is really important ine every project is to have a good test coverage. And you can do this in Vapor to. Let’s now add some test to the routes we created.
I recommend creating a helper extension for Application to save a lot of code duplication in tests:
 0extension Application {
 1
 2    static func startTestApp() -> Application {
 3        do {
 4            var app: Application!
 5            var env = try Environment.detect()
 6            var services = Services.default()
 7            var config = Config.default()
 8
 9            env.commandInput.arguments = []
10
11            try App.configure(&config, &env, &services)
12
13            app = try Application(
14                config: config,
15                environment: env,
16                services: services
17            )
18
19            try App.boot(app)
20            try app.asyncRun().wait()
21            return app
22        } catch {
23            fatalError("Unable to start App in tests")
24        }
25    }
26
27    static func stopTestApp(_ app: Application) {
28        try? app.runningServer?.close().wait()
29    }
30}
startTestApp is a method called in every test setUp function from XCTestCase and stopTestApp will be called on tearDown function. This function is actually running our server with test environment and test configuration that you can change as you like, I used default configuration here.
I also like creating something like BaseTestCase class that will provide all necessary properties to use in test
 0class BaseTestCase: XCTestCase {
 1    var app: Application!
 2    var connection: MySQLConnection!
 3
 4    override func setUp() {
 5        app = Application.startTestApp()
 6        connection = try! app.newConnection(to: .mysql).wait()
 7    }
 8
 9    override func tearDown() {
10        Application.stopTestApp(app)
11    }
12}
Now I can use this class as a base to every test case I would like to write. It will call setUp and tearDown functions for me and it will provide app property to use in tests. So let’s write a simple test case that will call our server main route, that is a http://localhost:8080 and will check if server responded with ok status:
 0final class SampleRouteTests: BaseTestCase {
 1
 2    func testSampelRoute() throws {
 3        let response = try? app.client().get("http://localhost:8080").wait()
 4        XCTAssert(response?.http.status == .ok)
 5    }
 6
 7    static let allTests = [
 8        ("testSampelRoute", testSampelRoute)
 9    ]
10}
now if you run this in Xcode by running ⌘+u or by running vapor test in console you should see that test passes. Writing tests in Vapor project is very easy cause you have whole environment already setup and all you have to do is check all the logic behind your routes.
Deployment
I think you are ready to deploy your first app, you know everything to build a great web app, but where to deploy it 🤔. There are a lot of options. You can use well known Heroku as it is supported or if you would like you can use docker image for vapor and deploy it in basically anywhere with access to bare metal like DigitalOcean.
There is also a new way to setup your first vapor app online. I think this one is the easiest and is very well integrated with Vapor CLI. It is called Vapor Cloud. So to use this you just need to create account by going here https://dashboard.vapor.cloud/, next by using vapor toolbox type in the console”
vapor cloud login
Next if you are already in you vapor app directory just type in
vapor cloud deploy
First run of this command will ask you a lot of questions about environments and databases to use company names etc. For first time I recommend using default settings for everything. After you will see how everything works you will have a plenty of time to play around with settings. After you deployed your first app it will also appear in online dashboard. Don’t worry about payments for now, Vapor cloud provides a lot for their Free Account Users so feel free to play around with it and then decide if you want to use it.
Summary
Wow 😲 I think we covered a lot in here! But still it is not all that you can do with Vapor, we did not even touched WebSockets that are actually a feature that you can use or advance caching where you can integrate with Redis or even auth methods, we have barely scratched the surface there. But I think it is a good place to start. I hope you now have a overview of what is Vapor how it works, how easy it is to create some basic functionality in it and if you come from Swift world then I think you will feel like you are in home with Vapor. Remember that the best way to learn is to try doing things yourself. I also learned a lot after reading two great books that I would like to recommend here.
First is a Server-Side Swift: Vapor Edition from Paul Hudson
Next one is a Server Side Swift with Vapor one of the great Ray Wenderlich editions written by members of Vapor Team.
Have fun reading my sources or trying some of this stuff by yourself, honestly making things with Vapor is really nice and intuitive especially for someone like me who already has some Swift experience. Back in the days when I was learning iOS it was only Objective-C and to actually deliver some end-to-end solutions I had to learn other language web frameworks like Ruby on Rails or Python Django today we have Swift and it can run on server so I find it really nice that you can write mobile and backend in same language and maybe share some code between apps it is really nice.
If you would like to check how some of the stuff we did here are working you can take a look here. What is also really great about Vapor is that you can actually use this repository as a vapor template like this:
vapor new myProject --template=riamf/vapor_app_base
It will create your new project from my template where you already will have a Basic Auth with User model persistance layer implemented in MySQL so feel free to use it or extend it for you convenience.